|
|
|
Notation |
|
|
|
North |


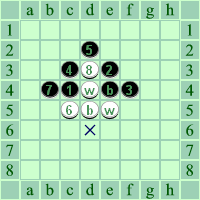
Diagram 3: Significant squares |
|
The squares on the reversi board are referred to using coordinate
notation in order to record games and allow the discussion of strategy. Certain significant squares are given special names. The
corners are a1, h1, a8 & h8. The X-squares are those squares
diagonally adjacent to a corner and the C-squares are the other
squares adjacent to a corner. Some analysts of the game also refer to
A-squares & B-squares as indicated left. The central 4x4
block of squares is |
|
|
W
e
s
t |
|
E
a
s
t |
|
|
South |
|
|
|
|
|
referred to as the sweet
sixteen, while the central 2x2 |
|
Diagram 4 |
|
|
|
block of squares initially occupied at the start of the
game is called the centre. The four edges of the board maybe referred to as the north, east,
south & west edges respectively and it is possible,
for example, to talk of the north-west corner of the board meaning the a1
corner and surrounding squares. |
|
|
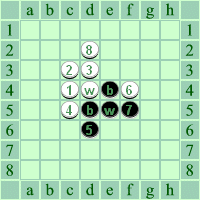
Games can be recorded either
by listing the move numbers and coordinates for each player
|
|
Black
1. c4
3. d3
5. d6
7. f5 |
White
2. c3
4. c5
6. f4
8. e6 |
|
or by recording the move
numbers in a grid. Diagram 4 shows a typical move sequence for the
Tanida opening overlaid on top of the position arrived at after the
first 8 moves. |
|
|
|
|
|
|
|
|
|
|
Maximum Disks
Strategy
or Greedy Algorithm |
|
Reversi |
|
Reversed Reversi |
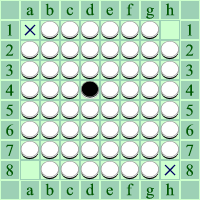
Diagram 5: Too much, too soon
(Run mouse over board to see result) |
|
Beginners usually start by interpreting the requirement to end up with the most
discs as a strategy for the whole game. This
position illustrates that having the most pieces at one point in time does
not necessarily guarantee a final victory. White leads 59-1 but has no valid
moves remaining. Black may now play into a1 or h8 followed by the remaining
corners in any order. White has to pass each time and thus black ends up winning the game 40-24!
It can also be tempting to try to wipe out your opponent earlier in the game
by taking as many of their pieces as possible however unless your opponent
is carelessly working the evaporation strategy and
not paying attention then it is unlikely that you will succeed. By the time
it becomes apparent that you have failed you are likely to have few good
moves left and your opponent will be well placed to drive you to defeat. |
|
In contrast this is an ideal endgame position
for white in Reversed Reversi as, like it or not, black is now forced to
take all four corners and ends up taking 40 discs to white's 24. In practice
however, trying to set up this sort of ideal endgame is dangerous. Taking so
many pieces can exhaust your
mobility
giving control of the game to your opponent. Consider diagram 5 where just
one of the X or C squares is black. White will then have to take one of the
four corners and, even with black taking the remaining three, the final
score will be 24-40 or 21-43 in black's favour! In
reversed reversi you don't have to worry about being wiped out as this too
counts as a victory, but this is another argument against wildly grabbing
useful looking territory. In one of my early reversed games I was so busy
preparing the ground for the big finish that I missed the fact that my
opponent was evaporating and
I was suddenly forced to take the last of his pieces before half of the
discs had even been laid. Needless to say I now try harder to ensure my
opponent's survival. |
|
|
|
Stable Discs |
|
Reversi |
|
Reversed
Reversi |
|
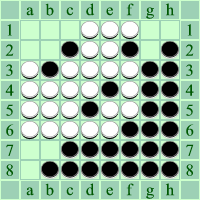
Diagram 6
(Mouse over to highlight stable discs) |
|
|
It should be readily apparent that once a disc
has been placed on a corner square it cannot be flipped, The disc is said to
be determined or stable. Neighbouring discs of the same colour are also
stable if there is no way for the opponent to outflank them through the rest
of the game. In diagram 6 black has 23
stable discs while white has just one (d6) that cannot possibly be flipped
by subsequent moves. Black needs to take and secure just 10 discs from the 40 available during the remaining play to secure a
win. |
|
In the reverse game you want to try to avoid
creating stable regions of your own colour while trying to "assist" the
creation of the same for your opponent. Creating blocks of your colour with
single "holes" into which your opponent must play at some point may prove
useful although you have to be wary of any negative side effects that might
arise for you when your opponent finally plays there. |
|
|
|
Positional
Strategy |
|
Reversi |
|
Reversed
Reversi |
|
|
Having seen how useful the corners are and
taking into account that each piece you lay may act as a 'stepping stone'
for your opponent it is easy to try to assign a fixed worth or fitness to
each square. Corners are very good, X & C-squares bad (because they may give
your opponent access to corners), A & B-squares OK etc. Since the board has
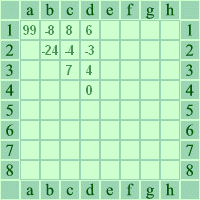
a number of symmetries there are only 10 distinct types of squares. Diagram
7 shows part of the static evaluation table used in the reversi program that
was included with past versions of Microsoft Windows. Fortunately the game is deeper
than this (otherwise it wouldn't be any fun) and a few games with players of
any strength will reveal that a strategy of trying to play in "good" squares
and avoiding "bad" ones will soon yield control of the game to your
opponent. Nevertheless an idea of static worth may help when it comes to
choosing between two moves that would otherwise appear of equal value using
other criteria. When planning a move you need to consider your opponents'
possible response, then your response to that and so on. At the end of the
game it might be possible to calculate all the variations but elsewhere in
the game you will need to have some mechanism to avoid having to consider
all possible branches more deeply than is practical - e.g. a feeling for the
relative worth of particular squares. |
|
Looking at diagram 5 it should be apparent that if you can force your
opponent to take all four corners and edges they are likely to end up with the most
discs. Simply inverting
the positional values of each square gives a first approximation to a fixed evaluation
of the reverse game. Further study shows that while occupying an X-square in
the classic game is likely to give away a corner and is therefore usually a
bad move, control of both the C-squares and the
X-square is required if you are to oblige your opponent to take up the corner. Once a disc has been placed on a C-square it
can only be flipped by a move to the corner square. The X-square can be flipped more readily
and may be used by your opponent as a stepping stone to a C-square. Likewise taking an early A-square can
provide access to C-squares for your opponent so should probably be avoided.
At least one A-square will be required
to prevent any possibility of your opponent flipping the X-square later in
the game however. Compare the south-east & south-west corners of the diagram
8
below. Black will almost certainly have to play to h8 before the game is
out, gaining an unwanted corner. However playing b6 will flip the disc on b7
and if white cannot flip b7 again then, depending on the relative
mobility
during the endgame, there is a possibility that white may have to take the
south-west corner before the conclusion of the game.
|
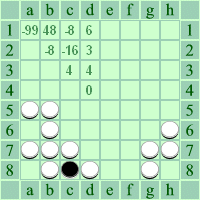
Diagram 8 |
While acknowledging the limitations of pure
positional strategy I would suggest the
above static table for consideration as a quick guide to the likely relative
value of various squares in Reversed Reversi. In short, C-squares are nearly
always useful, whereas those adjacent to them should probably be avoided
because they provide access to the C-square. |
|
|
|
Mobility |
|
Reversi |
|
Reversed
Reversi |

Diagram 9: White to play |
|
At each stage of the game you will have to
chose between the limited number of moves available to you. In
diagram 9 white has just 3 available moves or "liberties", two of which hand
a corner to black straight away. Assuming white plays to e8 black will have
13 moves available of which 11 will lead to a win with best possible play by
both sides thereafter. In this position white has poor mobility having few
moves to choose from, all pretty bad at that, while black has good mobility
having lots of choice. As long as there is at least one non-disastrous move
for each player the game will remain in balance but if you can start to
restrict the mobility of your opponent while maintaining your own then you
may be able to force them into having to make bad moves.
|
|
The concept of
mobility is also key to the reverse game. If you can achieve a position
where you can restrict the availability of moves to your opponent then you are
well on the way to victory. |
|
|
|
Frontiers |
|
Reversi |
|
Reversed
Reversi |
Diagram 11: Black to play |
|
Each move is played to an empty square
adjacent to an opponent's disc and flips at least one of their discs. The
discs which have empty neighbouring squares form the frontier while those
that do not are called interior discs. The more frontier discs you have, the
more choices your opponent has and, likewise, a smaller set of frontier
discs restricts the number of available moves. It should be clear that
minimising one's frontier is key to winning the battle for mobility. In
diagram 11 black should play a6 flipping 3 discs (rather than f7 which flips
1) as this keeps the frontier to a minimum. A move like this which does not
flip any frontier disks is called a quiet move and often represents good
play. This suggests a refinement of the evaporation strategy in which you
try to evaporate your frontier discs while not being so concerned with the
total numbers of discs flipped at each turn.
|
|
Maintaining a small set of frontier discs will
prove just as useful as it does in the regular game as it serves to increase
your relative mobility. |
|
|
Stoner Traps
or
"Heads I Win, Tales You Lose!" |
|
Reversi |
|
Reversed
Reversi |
|
|
|
A Stoner trap (named after John Stoner) is a
particular type of forced corner exchange that takes advantage of a weak
edge position, that is an edge including a C-square. The attacker first
gains control of a diagonal (meaning they have all the discs in that
diagonal) by playing to an X-square, then attacks the opponent's weak edge
by threatening to take a corner. The opponent cannot respond by taking back
the edge since this would flip back the X-square played in the previous move
and provide access to the other corner. Whatever response the defendant
makes the attacker gains at least one corner square and a number of stable
discs.
In diagram 12 white plays b7 threatening d8 on a subsequent move.
Looking at diagram 13, black cannot deny access to d8 by playing it
themselves as this gives white access to h8. Wherever else black chooses to
play white will be able to play d8 on the next move with the threat of h8 to
follow. If black then plays b8 to recover the south edge, b7 will be flipped
and provide access to a8 for white who may then take all of the southern
edge. Once the trap has been set the best that black can hope for is to get
access to a8 in exchange for losing the h8 corner. |
|
The nearest analogy I've come up with is this
sort of position. White plays d8 to gain access to at least one C-square
with the hope that, having access, black can be obliged to capture the edge
later in the game. A black reply to e8 also flips f7giving white access to
g7 and the opportunity to take all of the southern edge.
|
|
|
|
|
|
|
|
|
|
|
Openings
It is quite easy to lose control of the
game in the first few moves. Play the wrong move and your opponent will be
able to restrict your choice of moves to those that work in their favour.
While the concepts discussed above may help guide your opening moves it is
worth looking at some standard openings which appear to preserve the balance
of control, at least for a while. The openings page
has an illustrated step-by-step guide to
some of the more promising opening variations and a list of common named
openings.
 |
|
|
|
|
|
|
 Animated Openings, Tricks & Traps Etc. Animated Openings, Tricks & Traps Etc.
In addition to the original openings page
the main section of this site now comprises of a JavaScript applet that demonstrates all the standard opening sequences, illustrates some of the potential traps that you can try to set or
avoid and includes a selection of short wipe-out games and some
complete regular and reversed games.
|
|
|
|
|
|
|
|
|
Topics to come...
(eventually)
Tempo
Move order
Wedges
Poison
Swindles
Conclusion |